Recipe Tasting: Pumpkin White Chocolate Cupcakes

IMG_3876

Fall flavors in all their glory.

Fall always makes me smile. It isn’t the ubiquitous PSL or the obscenely early holiday decor, but the crispness in the air, the rainy days sitting on the heating grate on my mother’s floor, looking out the window, and the overall snuggly, safe feeling that sweaters, scarves, and a mug of something warm bring. Fall is a little less about adventure and a little more about security, love, home.

But I also love the little kids that are somehow out in DROVES this time of year. Kids racing through, over, and around hay mazes of all shapes and sizes. Kids in costume on Halloween parade. Kids picking out pumpkins in pumpkin patches. Ah, yes. This is where I was going when I got swamped by fall nostalgia. Pumpkins.

Quite simply, pumpkins are delicious – that’s why we’re here at this blog post right now! Most people start and end with pumpkin pie. Some people go the extra mile and make pumpkin soup. Marcus Samuelsson makes an insanely good salsa that features pepitas. But most of the time, you look at a pumpkin and think, “that is way too much work.” But actually, it isn’t all that bad! So, I would like to introduce you to fresh pumpkin cupcakes – a new adventure that doesn’t take too much extra effort.

To start, you have to have the right type of pumpkin. All pumpkin varieties are edible, but different varieties have different qualities. If you’re headed to the grocery store, stick with “sugar pie,” “sugar baby,” or just “pie” pumpkins. This variety is bred for tasting great, particularly in baked goods. I wouldn’t go for one of those big Jack O’Lanterns or pretty decoratives – they are bred for their stability or good looks, respectively, over their taste. Their flesh is stringy, slightly bitter, and watery and requires a lot more sieving and, really, weren’t we just talking about reducing the workload of pumpkins? If you’re headed to a farmers’ market, I would just go ahead and ask your farmer – there are definitely more cool and delicious varieties than I can name.

IMG_3881

Stick a fork in me – I’m ready to be eaten!

Once you’ve picked your pumpkin, the rest is a pretty simple cake. I’ve indicated below that you should whisk, stir and fold everything by hand for this recipe. As it is already a pretty dense cake and the pumpkin adds a good amount of the total volume after you combine the first set of ingredients, beating it with a mixer will surely cause too much gluten formation. Gluten makes your final product chewy, which is good for pizza, but bad for cupcakes.

So, after finding the right pumpkin and treading lightly with regards to the whole gluten situation, you should be able to get through this recipe without much trouble. Then, you’ll be able to experience how delicious pumpkin can be. And you can wrap yourself in the cozy, warm, safe love of fall, too.

Fresh Pumpkin Cupcakes with White Chocolate Chunks
(Original recipe from CupcakeBlog.com)
Makes approximately 24 regular cupcakes

Ingredients
3 cups flour
1 teaspoon baking soda
1 teaspoon baking powder
1/4 teaspoon salt
2 teaspoons cinnamon
1/4 teaspoon allspice
1/8 teaspoon nutmeg
2 cups sugar
1 cup vegetable oil
3 eggs
2 teaspoons vanilla
4 cups shredded fresh pumpkin
4 ounces white chocolate, chopped

Preparation
1. Preheat your oven to 350 degrees.
2. Cut open a pumpkin, take out the seeds and inner flesh, then chop into manageable chunks.
3. Grate the pumpkin chunks, skin and all, with a box grater until you have four cups of grated pumpkin. You’ll use about half your pie pumpkin, so save the rest for some delicious, homemade pumpkin purée that you can make later.
4. Measure the flour, baking soda, baking powder, salt, cinnamon, allspice, and nutmeg into a medium sized bowl and whisk to combine.
5. Measure the sugar, oil, eggs, and vanilla into a large size bowl and whisk together.
6. Add about a fourth of the dry mixture to the wet and fold together. By hand. Seriously. (“Folding” means you cut straight down the middle, scrape the bottom of the bowl, lift the batter, and sprinkle the dry flour across the top. Spin the bowl a quarter turn, then start again. Here’s a good demo with a bonus lemon pancake recipe!)
7. Continue adding in fourths until all the dry is incorporated. The result with be a very thick batter and a tired arm.
8. Fold the pumpkin and chocolate chunks into the batter.
9. Scoop into cupcake papers about two-thirds full.
10. Bake for about 25-30 minutes. There are a lot of methods to tell if a cupcake is done. The most obvious way is a cake tester or toothpick. But what if you can’t find a toothpick? My favorite is by touch – if you press down lightly on top of the cupcake with your finger, it should spring back nicely. If your finger leaves an imprint, it needs a little more time.

Cream Cheese Frosting
(Original from SmittenKitchen.com)

Ingredients
8oz Cream Cheese, room temperature
1/2 cup butter, room temperature
3 cups confectioner’s sugar, sifted
1 teaspoon vanilla extract

Preparation
1. Cream the butter and the cream cheese in a stand mixer for 2 minutes at medium speed (4ish). Yes, that sounds excessive. No, it isn’t.
2. Add in the confectioner’s sugar in two batches. Start the stand mixer slowly or it will cause the sugar to explode all over you!
3. Add in the vanilla and beat for a few more seconds.
NOTE: this frosting is a little sweet, but that is the trade that you make for increased stability. More sugar means better shape. Less sugar means softer and it could be melty at room temperature.
NOTE NO. 2: I pretty much consistently use 1.5 to 2 times the frosting this recipe makes. Everyone works differently, but I would at least make 1.5 times the frosting on your first try of this recipe.

Assembly
1. Fit a pastry bag with a big tip. I like to use the biggest circle tip I can find.
2. Fill the pastry bag with frosting and pipe fabulous designs onto your cupcake. I go with one big swirl.
3. EAT!


Sunbutter + Chocolate Chips + Ingredients by Weight = Magic

Sunbutter Chocolate Chip Cookie Stack

Leaning Tower of Tasty

I used to be in the minority. I was akin to a mythological being – the mysterious and misunderstood Nut Allergy Person. Because of my condition, I don’t really remember or know what a many things taste like – peanut butter, Rocky Road ice cream, those amazing smelling cinnamon-roasted nuts that they sell at stands around Christmastime. These days, there is barely a child out there that doesn’t have a food intolerance or four. So, I thought you might want to be prepared for the Nut Allergy Person who will inevitably come into your life (I don’t have an answer for your Gluten Free Person yet, sorry).

“How?” you might ask. With Sunbutter, which is actually a specific brand of the generic food sunflower seed butter (there are other brands). People had been telling me about Sunbutter for a few years before I tried it. I waived them off because I believed that I didn’t need their nut-loving pity. Boy, was I wrong. I bought some about 6 months ago and it was everything that I imagined peanut butter could be! Butterflies flew, birds sang and rainbows formed across the sky. Ok, not really all that, but it was so delicious that I had to try all sorts of silly things that I hadn’t eaten like Sunbutter and jelly sandwiches and Sunbutter, honey and bananas on toast. I went on a rampage and ate my first jar in weeks. Which was probably not good because it does still have the fat and calories of actual peanut butter (but, also the protein, I like to tell myself). Oh, well.

Turns out, after some trials with normal humans, Sunbutter doesn’t actually taste anything like peanut butter. What a let down. But it still has that creamy, roasted, nutty goodness that makes peanut butter so beloved, and it is a shockingly good direct substitute for peanut butter in baked goods. This got me thinking about Sunbutter cookies. So, I whipped out my trusty binder that just happens to have a gorgeous peanut butter cookie recipe.

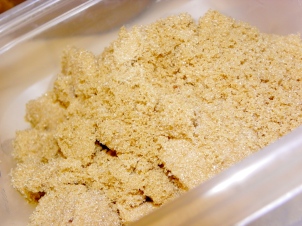
Up Close and Personal with Brown Sugar

Brown sugar adds moisture and chewiness to the cookie, and a caramel undertone that compliments the Sunbutter.

But this recipe is something special. It has the ingredients by weight. And not just any weight – metric. You may be thinking, “ABORT! ABORT! This is too hard!” Fortunately for you, you would be wrong. Baking IS a precise undertaking. A little too much sugar or a not enough fat and the deliciously baked outcome you worked so hard for could change or fail entirely. Every person that scoops a cup of flour will get a different weight, depending on the method they use. You can quickly tell that this is not good when it comes to baking precisely. A small investment (mine was $50) in a food scale can change everything! It will take a few times to get used to the new method. Questions arise like, “How many eggs equal 98 grams?” But then you learn great tips, like each large egg is approximately 50 grams (yes, ALWAYS, but pay attention when using different sizes, like jumbo), so 98 grams not quite two large eggs. Of course, this leads to more questions, like “How the heck do you manage 1.98 eggs? Can’t I just use two?” The answer? NO and you need an equal amount of white and yolk, so all you have to do is crack an egg into a tupperware with a lid, then scramble the egg with a few serious shakes. Then use about 98% the scrambled egg. Ta da! So, consider this a fabulously fun adventure and give it a shot. Learning is cool – get into it!

And here is your first adventure: combining the two things we have talked about in this post into something delicious!

Sunbutter Chocolate Chip Cookies

Big THANK YOU to the San Francisco Baking Institute for the foundation for this recipe!
Makes approximately 2 dozen cookies

Ingredients
223g Room temperature butter
197g Sugar
193g Brown sugar
252g Sunbutter (You can pick this up at your nearest Whole Foods)
98g Eggs
3g Vanilla extract
367g All-purpose flour
14g Baking powder
3g Salt
200g Dark chocolate chips/chunks

Preparation
1.  Preheat your oven to 375 degrees.
2.  Combine the dry ingredients and reserve.
3.  Cream the butter and sugars.
(How long you ask? I do approximately 2 minutes on speed 2 in my KitchenAid stand mixer. That is enough to equally distribute the sugar crystals within the fat crystals, but not so much that you overwork it.)
4.  Add the egg and the vanilla and then the Sunbutter.
5.  Add the dry ingredients and mix until well incorporated.
(I like to give it a little go in the mixer, but mostly do this step by hand to prevent excess gluten formation through over beating. You don’t have to do much, since you are mixing more in the next step anyway.)
6. Mix in the chocolate chunks. By now everything should be incorporated perfectly.
7.  Scoop cookie dough in 50-60g scoops onto a cookie sheet.
(This makes fairly large cookies, once they bake and spread. You can make whatever size you prefer, but the important thing is that they are all the same. This promotes even and uniform baking. Using a ice cream scoop helps.)
8.  Bake for 22-26 minutes (my oven took 24)
9. Enjoy!

Recipe Testing: Amor, Familia y Sopa – Green Pozole with Chicken

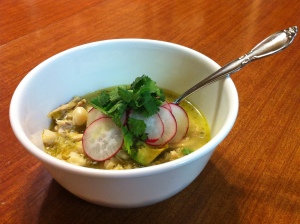
Green Pozole with Chicken

The radish, avocado, cilantro and lime toppings take this sopa to the next level!

There is a reason soups fall in the “comfort food” category. Soup just screams warmth, comfort and family. Which is why maybe soup in the heat of August is a little weird. But bear with me. Last week, my grandfather passed away quite suddenly. Heartbreak, grief, and exhaustion set in and stiffened all of us to the core. So what did I do? I cleaned my mom’s house and made pozole.

I didn’t get much home-cooked pozole growing up. I became a tried and true pozole addict at Consuelo Mexican Bistro at Santana Row in San Jose, CA (seriously. If you can, #gotothere). So, I had to do a little digging to find a recipe that wouldn’t take all day, but would still be full of well-built flavors. I found this one at Epicurious.com and, while a little involved, it only takes about 2 hours from whipping out the chef’s knife to digging in.

This recipe creates a really robust, spicy pozole with lots of “stuff.” As my husband might say, “There is a high stuff to broth ratio.” There are a lot of types of pozole out there, so you might be looking for a milder or more brothy version. For milder, shoot for the smaller jalepeños that have less time to age and build up capsaicin, or choose a still-flavorful, less spicy pepper, like Poblano or Anaheim. Remove all the seeds and the VEINS, which is where all the spice really builds up in a pepper, before tossing it into the blender. For a version with more broth, save some of that shredded chicken for a ridiculously amazing barbecue pulled chicken sandwich later in the week, and/or reduce the amount of hominy. You could go all the way down to half the amount of hominy and still have a meaningful pozole. Don’t just add more broth – that dilutes the flavor you just built up in the first part of the recipe.

Me and Papa

My grandfather at my wedding

A couple other things to note about this recipe are about pumpkin seeds (pepitas), step 10, and pans. Let’s start with pepitas. You can usually find these in the “Mexican” section of the grocery store. Get the green ones with lots of meat. Don’t let the “roasted” and “salted” ones fool you – those are more for chewing and spitting at the ballpark than this recipe. Not only are they too salty, but they are lacking the meat that gives your soup base the delicious body it deserves.

Now, your warning about Step 10. When the recipe says “it will splatter and steam,” it really means it. Invest in a splatter guard, wear an apron, and perhaps consider long sleeves. But when you are tempted to turn the heat down to protect yourself, just remember – it is supposed to be doing that! You’re ok – go with it. I acquired this cooking zen moment when making dry caramel, but that is another recipe for another time.

Finally, pans. This called for 3 separate pots of different sizes and a little pan. I already make more dishes than anyone I’ve ever met, so I scratched that and just used my 6-quart Dutch oven the whole time (except the little pan part), wiping down when appropriate.

This pozole warmed my heart with all sorts of good memories of my grandfather, of family, and of togetherness. Hopefully, when you need a tasty hug, a warm embrace (from the inside), or just want to pass a little familia to your loved ones, you can turn here.

Green Pozole with Chicken

Gourmet Magazine, February 2003 and Epicurious.com

Ingredients
9 cups water
1 Turkish or 1/2 California bay leaf
1 large white onion, halved lengthwise and thinly sliced
6 garlic cloves, chopped
2 1/2 teaspoons salt
3 lb skinless boneless chicken thighs
1/2 cup hulled (green) pumpkin seeds (not roasted; 2 1/4 ounce)
1 lb tomatillos, husked and scrubbed
2 fresh jalapeño chiles, quartered (including seeds)
3/4 cup chopped fresh cilantro
1 teaspoon dried epazote or oregano (preferably Mexican), crumbled
2 tablespoons vegetable oil
2 (15-oz) cans white hominy, rinsed and drained

Accompaniments: diced radish; cubed avocado tossed with lime juice; shredded romaine; chopped white onion; lime wedges; dried oregano; cilantro

Special equipment: an electric coffee/spice grinder

Preparation
Cook the Chicken
1. Bring 8 cups water, bay leaf, half of onion, half of garlic, and 1 teaspoon salt to a boil, covered, in a 6-quart heavy pot
2. Reduce heat and simmer 10 minutes
3. Add chicken and poach at a bare simmer, uncovered, skimming off any foam, until just cooked through, about 20 minutes.
4. Transfer chicken to a cutting board to cool. When chicken is cool enough to handle, coarsely shred with your fingers or two forks.
5. Pour broth through a fine-mesh sieve into a large bowl, discarding solids, and reserve.

Roast the Pumpkin Seeds
6. Cook pumpkin seeds in a dry small skillet over low heat, stirring occasionally, until puffed but not browned (seeds will pop as they puff), 6 to 7 minutes.
7. Transfer pumpkins seeds to a bowl to cool completely, then finely grind in coffee/spice grinder.

Make the Sauce
8. Simmer tomatillos and remaining onion in remaining cup water in the original 6-quart heavy pot, covered, until tender, about 10 minutes.
9. Drain vegetables and purée in a blender with jalapeños, 1/4 cup cilantro, epazote, remaining garlic, and remaining 1 1/2 teaspoons salt.

Put Everything Together
10. Again using the original 6-quart heavy pot, heat oil over moderately high heat until hot but not smoking, then add purée (use caution as it will splatter and steam).
11. Cook, uncovered, stirring frequently, until thickened, about 10 minutes.
12. Stir in pumpkin seeds and 1 cup reserved broth and simmer 5 minutes.
13. Stir in shredded chicken, hominy, and 3 more cups reserved broth and simmer, partially covered, 20 minutes.

Eat!
Serve pozole in deep bowls with accompaniments.